Thermal Transplant WGBS PicoMethyl Protocol
Protocol For Using the Zymo Pico Methyl Seq Library Prep Kit
Goal
Prepare sequenceable libraries of DNA that have been bisulfite converted for methylation data and subsequent whole genome bisulfite sequencing. This a modified version of this protocol for the Thermal Transplant Molecular project with extracted DNA from adult and larval Porites astreoides.
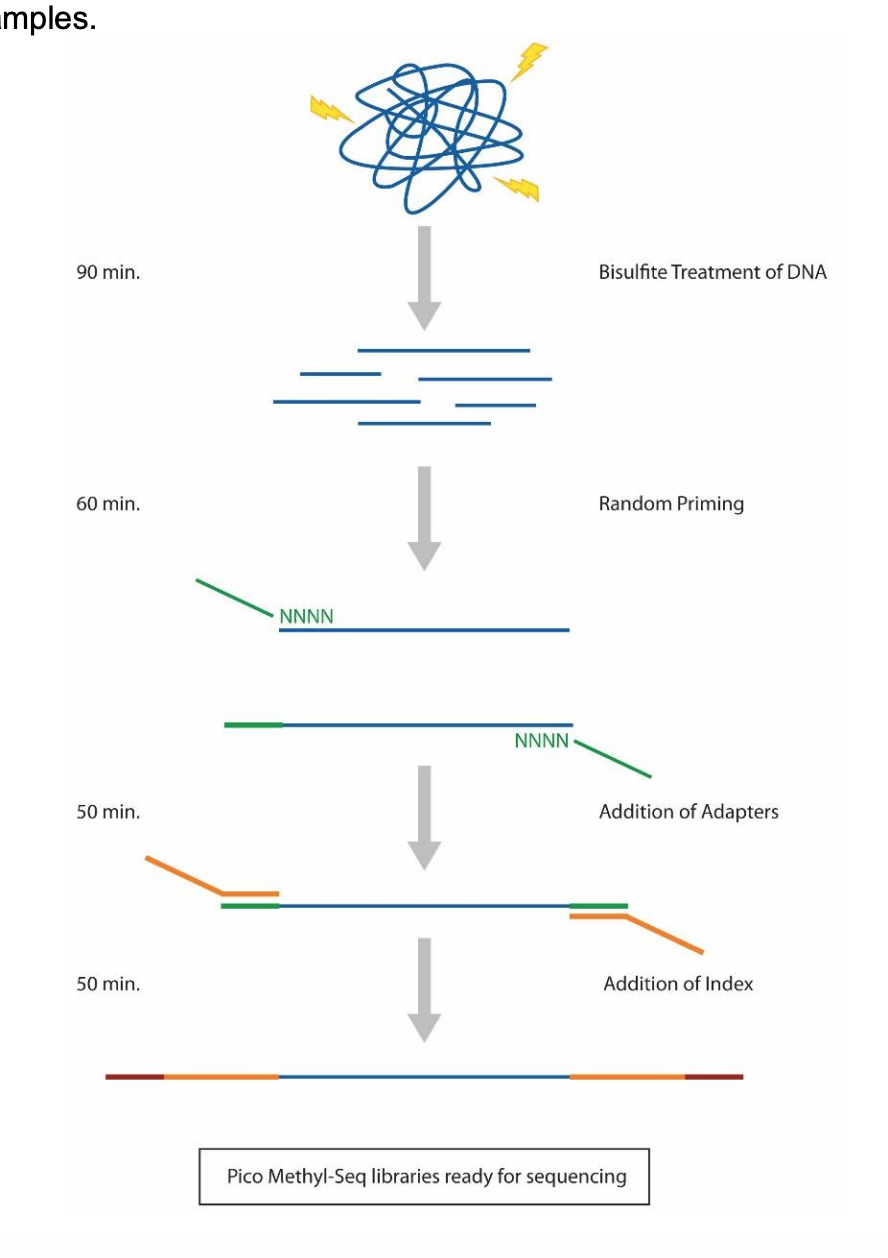
Prep Workflow Diagram from Zymo:
Materials and Equitpment
- Pico Methyl Seq Library Prep Kit
- Thermocylers (Eppendorf Mastercycler Pro)
- Microcentrifuge tubes
- Ethanol
- Magnetic DNA binding beads
- Magnetic plate for 96 well plates
- Multichannel and regular micropipettes
- Filter pipette tips
- Broad range dsDNA Qubit assay and tubes for Qubit use
- TapeStation4200 or other fragment analyzer
- D5000 Tapestation Supplies
- UDI Index primers (see spreadsheet)
Protocol Steps
- DNA dilution
- Bisulfite Conversion
- Post-Conversion Column Cleanup
- Amplification with Prep-Amp Primers
- DNA Clean and Concentrator Cleanup
- 1st Amplification
- DNA Clean and Concentrator Cleanup
- 2nd Amplification with Index Primers
- 1X Bead Cleanup
- Broad Range dsDNA Qubit Assay
- D5000 TapeStation Assay
Note about Thermocycler Programs
- All programs are under the “mes” login, password 888
- All programs are in the “PICO” folder
- Depending on input amount of DNA, you will use different AMP 1 and AMP 2 programs:
- For 1ng DNA input: use “10 PICO METHYL AMP 1” and “12 PICO METHYL AMP 2”
- For 10ng DNA input: use “8 PICO METHYL AMP 1” and “10 PICO METHYL AMP 2”
- I used the amps for 10ng in this protocol
Note about timing and planning this prep
- Calculate how much DNA you’re going to use before you start the prep, ideally for all samples, getting the volumes ready before you start
- Plan how you will index your samples before starting the preps. We have paired i5 and i7 indexes that go from 1-60. Each sample needs a unique pair, and the individual indexes are not used more than once. Ie you can have two samples that have i5-1, i7-1, and i5-2, i7-2. But you cannot have two samples that have i5-1, i7-1, and i5-1, i7-2. i5-1 can’t be used twice to mitigate any possible index-hopping (however rare)
- The list of primer/indexes we have are here. Right now there are 1-60
- It can make things easier on you do the prep over 1.5 days: start the prep in the afternoon by doing the DNA dilution and bisulfite conversion. The BS converted DNA can be stable at 4 degrees C for 20 hours. So you can take it out of the thermocycler after the conversion program and store it in the fridge for the next day
- It will probably take you the entire second day if you do 10 or more samples (including the QC)
- While things are in the thermocycler, it can be helpful to start making the mixes for the next step and keep them on the ice bucket
DNA Dilution - Plan this before starting your library prep
- For this protocol, I used a 10ng input of DNA.
- This was completed by:
- Diluting a subset of extracted DNA to 1ng/uL with 10mM Tris HCl
- Sample dilution and mix calculations can be found on this google sheet
Bisulfite Conversion
- For each sample add 10uL of the 1ng/uL diluted DNA to a PCR strip tube
- Add 10uL of 10mM Tris HCl to each strip tube to have a total volume of 20 uL.
- Add 130ul of Lightning Conversion Reagent to each tube. The total volume in each tube is now 150ul
- Vortex and spin down tubes
- Place tubes in the thermocycler, use the “mes” login, password 8888, folder “PICO”. The program is titled “BS CONVERSION PICO.” Program specifications:
- 98 degrees C for 8 minutes
- 54 degrees C for 60 minutes
- 4 degrees C hold
- ~1.5 hours
- Once the program is done, samples can be stored in the fridge for up to 20 hours, so you can safely stop here overnight
- Video link
Post-Conversion Column Cleanup
- Label 1 spin column and collection tube for each sample
- Add 600ul of M-Binding Buffer to each spin column
- Add the entire (150ul) bisulfite conversion reaction to their respective spin columns
- Cap and invert the spin columns (with collection tube attached) 5-10 times to well mix
- Centrifuge spin columns at 16,000rcf for 30 seconds Video link
- Discard flow through in a liquid waste beaker, there is a hazardous waste container for Pico Methyl Seq Kit liquid waste in the SAA
- Add 100ul of M-Wash Buffer to each spin column
- Centrifuge spin columns at 16,000rcf for 30 seconds and discard flow through in waste container
- Add 200ul of L-Desulphonation Buffer to each spin column Video link
- Let columns sit at room temperature for 15 minutes
- Warm the tube of DNA Elution Buffer in the thermomixer to 56 degrees C
- Label new 1.5mL tubes, 1 for each sample (temporary)
- Centrifuge spin columns at 16,000rcf for 30 seconds and discard flow through in waste container
- Add 200ul of M-Wash Buffer to each spin column
- Centrifuge spin columns at 16,000rcf for 30 seconds and discard flow through in waste container
- Add 200ul of M-Wash Buffer to each spin column
- Centrifuge spin columns at 16,000rcf for 2 minutes
- Grab and thaw reagents needed for PrepAmp Primers on ice
- Transfer spin columns to their new labeled 1.5mL tubes
- Discard flow through and collection tubes
- Add 8ul of warmed DNA Elution Buffer by dripping directly onto the filter of the spin columns Video Link
- Incubate columns at room temp for 5 minutes
- Make master mixes for the PrepAmp Primers
- Centrifuge the spin columns in tubes at 16,000 rcf for 30 seconds
- Discard spin columns and keep 1.5mL tubes on ice
- Check if all tubes have the same volume (greater elution volume may cause library prep failure)
Amplification with Prep-Amp Primers
- Thaw needed reagents from Pico Methyl Seq reagent box in the -20:
- 5X PrepAmp Buffer
- 40uM PrepAmp Primer
- PrepAmp Pre-mix
- PrepAmp Polymerase
- Determine n number: number of samples + % error (~5%)
- Create Priming Master Mix (PMM) on ice:
- 2ul 5X PrepAmp Buffer * n =
- 1ul 40uM PrepAmp Primer * n =
- Vortex and spin down PMM and keep on ice
- Create PrepAmp Master Mix (PAMM) on ice:
- 1ul 5X PrepAmp Buffer * n =
- 3.75ul PrepAmp Pre Mix * n =
- 0.3ul PrepAmp Polymerase * n =
- Vortex and spin down PAMM and keep on ice
- Create “diluted” PrepAmp Polymerase mix to avoid adding less than 0.5ul during protocol (original protocol asks you to add 0.3ul to the tubes in the thermocycler, sometimes that small of an amount does not come out of the tip so you can add DNA elution buffer to the enzyme to pipette 0.5ul). Make this on ice:
- 0.3ul PrepAmp Polymerase * n =
- 0.2ul DNA Elution Buffer * n =
- Pipette mix and spin down the diluted polymerase and keep on ice
- Make new strip tubes for each one of your samples
- Add 7ul of bisulfite converted sample to their respective strip tube. This should be about all the liquid there is in the final tubes from the previous cleanup
- Add 3ul of PMM to each tube
- Video Link
- Vortex tubes, spin them down, and place them in the thermocyler in the “PICO METHYL PRIMING” program under the MES login (password 8888)
- During the program there will be two holds during which you will have to add things to your samples:
- 98 for 2 minutes
- 8 degrees for 1 minute
- 8 degree hold
- During hold, open the machine and take out the tubes (don’t press a button yet!) vortex and spin the tubes down, add 5.05µl PAMM to each tube, vortex and spin the tubes down again, and place back in thermocycler and press enter on the machine, Video link
- 8 degrees for 4 minutes
- 16 degrees for 1 minute with 3% ramp rate
- 22 degrees for 1 minute with 3% ramp rate
- 28 degrees for 1 minute with 3% ramp rate
- 36 degrees for 1 minute with 3% ramp rate
- 36.5 degrees for 1 minute with 3% ramp rate
- 37 degrees for 8 minutes
- repeat back from the first step one time through again
- During hold, again open the machine and take out the tubes without pressing a button, vortex and spin them down, then add 0.5ul of the diluted PrepAmp Polymerase to each tube then, vortex and spin them down again, and place back into thermocycler and press enter on the program
- It should take 20ish minutes between the two holds in the program
- When the program is done take out the tubes and place them on ice
- Set up tubes and spin columns for the next step
DNA Clean and Concentrator Cleanup (DCC)
- Make new 1.5mL tubes for each of your samples
- Add 108.85ul of DNA binding buffer to each of the new 1.5mL tubes. This is a 7:1 ratio of the amount of liquid from the PrepAmp Priming reaction
- Set the thermomixer to 56 degrees C and place the DNA Elution Buffer in to warm
- Add the total volume of the strip tubes from the PrepAmp Priming reaction to their respective 1.5mL tube. This should be 15.55ul but there may be less because the lid temperature on the theremocycler program is low and does not prevent evaporation. Video ink
- Vortex and spin down the 1.5mL tubes to mix
- Set up a spin column and a collection tube for each sample (same as before)
- Add the total volume of the 1.5mL tube to their respective spin column. Video link
- Centrifuge the spin columns at 16,000rcf for 30 seconds
- Discard the flowthough in the same waste beaker or container as above
- Add 200ul of DNA Wash Buffer to each spin column
- Centrifuge the spin columns at 16,000rcf for 30 seconds and discard the flow through
- Add 200ul of DNA Wash Buffer to each spin column
- Centrifuge the spin columns at 16,000rcf for 2 minutes
- Grab AMM reagents
- Make new 1.5mL tubes for each sample
- Transfer spin column to new 1.5mL tube and discard the collection tube
- Add 12ul of warmed DNA elution buffer directly by dripping to each spin column
- Incubate spin columns at room temp for 5 minutes
- Make AMM master-mix
- Centrifuge spin columns at 16,000rcf for 30 seconds
- Discard spin columns and keep elution tubes on ice
1st Amplification
- Thaw reagents needed on ice:
- (2X) Library Amp Master Mix
- Library Amp Primers (10uM)
- Make new strip tubes for each of the samples
- Make the 1st Amplification Master Mix (AMM) on ice:
- 12.5ul Library Amp Mix (2X) * n =
- 1ul Library Amp Primers (10uM) * n =
- Vortex, spin down, and place AMM on ice
- Add 13.5ul of AMM to each of the new strip tubes on ice
- Add 11.5ul of sample from the DCC elution to their respective strip tube
- Vortex and spin down tubes
- Place in the thermocycler and choose the program “8 PICO METHYL AMP 1”
- ~32 mins
- Once the program is done take out the tubes and place on ice
- Video link
DNA Clean and Concentrator Cleanup (DCC)
- Make new 1.5mL tubes for each of your samples
- Add 175ul of DNA binding buffer to each of the new 1.5mL tubes. This is a 7:1 ratio of the amount of liquid from the 1st Amplification reaction
- Set the thermomixer to 56 degrees C and place the DNA Elution Buffer in to warm
- Add the total volume of the strip tubes from the PrepAmp Priming reaction to their respective 1.5mL tube. This should be 25ul
- Vortex and spin down the 1.5mL tubes to mix
- Set up a spin column and a collection tube for each sample (same as before)
- Add the total volume of the 1.5mL tube to their respective spin column
- Centrifuge the spin columns at 16,000rcf for 30 seconds
- Discard the flowthough in the same waste beaker or container as above
- Add 200ul of DNA Wash Buffer to each spin column
- Centrifuge the spin columns at 16,000rcf for 30 seconds and discard the flow through
- Add 200ul of DNA Wash Buffer to each spin column
- Centrifuge the spin columns at 16,000rcf for 2 minutes
- Make new 1.5mL tubes for each sample
- Transfer spin column to new 1.5mL tube and discard the collection tube
- Add 12.5ul of warmed DNA elution buffer directly by dripping to each spin column
- Incubate spin columns at room temp for 5 minutes
- Grab indices below
- Centrifuge spin columns at 16,000rcf for 30 seconds
- Discard spin columns and keep elution tubes on ice
2nd Amplification
- Thaw the Library Amp Master Mix (2X) on ice
- Thaw the planned paired indexing primers for your samples
- Make new strip tubes for each of the samples
- In each strip tube combine:
- 12ul of DNA from the above DCC step
- 14ul of Library Amp Master Mix (2X)
- 1ul of the i5 10uM index primer
- 1ul of the i7 10uM index primer
- For adding these I usually make a table where each addition can be highlighted after each pipette, ex:
| sample | vol DNA | vol LibAmp MM | vol i5 | vol i7 |
|---|---|---|---|---|
| 1 | 12 | 14 | 1ul index 1 | 1ul index 1 |
| 2 | 12 | 14 | 1ul index 2 | 1ul index 2 |
- Vortex and spin down tubes after all components are added to each tube
- Place tubes in the thermocycler and choose the program “10 PICO METHYL AMP 2”
- ~30 mins
- Take Kapa Pure Beads out of the fridge
- After the program is done, place the samples on ice
- Video link
1X Bead Clean Up
- Take KAPA Pure Beads out of the refrigerator ~30 minutes before use to get to room temperature. Swirl the bottle to mix the beads but don’t vortex
- Make fresh 80% ethanol for the day, using 100% ethanol (in the flammable cabinet) and ultrapure water
- When beads are at room temp, add 26ul (equal volume) of beads to each strip tube. Pipette slowly because the bead solution is very viscous. Pipette mix the bead-sample mix at least 10 times until homogeneously brown. Video link
- Set up the rotating shaker on the Qubit bench and place the strip tubes on the shaker, rotating at 200rpm for 15 minutes
- Get the “short” magnet plate from the Puritz lab bench: it’s silver, clear, and white with horizontal magnetic bars
- At the 15 minutes on the shaker, place the tubes on the magnet rack and wait until the liquid goes clear and the beads have gone to the magnet
- Using a p200 pipette set to 45ul, carefully remove the clear supernatant from each tube without disturbing the beads and discard in a waste trough
- Add 200ul of 80% ethanol to each tube
- Remove the ethanol (200ul) from each tube carefully, without disturbing the beads, and discard the liquid in the waste trough
- Add another 200ul of 80% ethanol to each tube. Video link
- Remove the ethanol (200ul) from each tube carefully, without disturbing the beads, and discard the liquid in the waste trough
- Use a p20 set to 20ul to remove any residual liquid in each tube
- Let tubes air dry for ~1 more minute
- Take the tubes off the magnet
- Resuspend the beads in 15ul of DNA elution buffer: Pipette directly onto the bead patch over and over until the beads go into solution
- Place the tubes back on the shaker at 200rpm for 5 minutes
- Grab qubit and tapestation reagents
- After the 5 minutes place the tubes back on the magnet plate and wait until the liquid goes clear and the beads are to the magnet
- Make new strip tubes (final tubes) that are well labeled for your libraries (sample name, date, “lib” initials)
- Freeze at -20 degrees C if not doing QC on the same day, if QCing next, place on ice
Broad Range dsDNA Qubit Assay
- Use the protocol for the Qubit Assay
- Make sure to read each sample twice and use the average as the DNA library concentration
D5000 TapeStation Analysis
- If you get Qubit values for each of your libraries you should run them on the TapeStation to access the library size. If one library had too low DNA concentration the prep probably failed somewhere and there is no need to use the TS on that library
- Use the D5000 TapeStation protocol to see the size range of your completed libraries. Make sure all reagents say D5000 on them
- Make sure not is one library is drastically a different size distribution than others, that is probably not good to sequence
Example TS trace for a good and sequenced WGBS library:

Written on April 16, 2021